Definitive Guide
6 chapters
~33 min

Gin Tutorial: The Ultimate Guide (2023)

In this Gin tutorial, you will learn Gin from scratch to an advanced level. You will learn how to build and deploy your first Gin app.

SO
Solomon Eseme
Updated 9/16/2023
1
Chapter 1

Chapter 1: Getting Started with Gin

2 articles
~5 min
1

What is Gin?

Gin is a powerful and lightweight web framework for building backend applications in the Go (Golang) programming language. It is designed to be fast, efficient, and minimalistic while providing essential features to develop robust web applications and APIs. With its excellent performance characteristics, Gin has become popular among backend engineers and developers, prioritizing speed and simplicity in their projects.

2 min read

What is Gin?

Gin is a powerful and lightweight web framework for building backend applications in the Go (Golang) programming language. It is designed to be fast, efficient, and minimalistic while providing essential features to develop robust web applications and APIs. With its excellent performance characteristics, Gin has become popular among backend engineers and developers, prioritizing speed and simplicity in their projects.

Advantages of Using Gin

As a software developer, choosing the right web framework is crucial for the success of your projects. Here are some key advantages of using Gin:

  1. High Performance: Gin is built with speed in mind. It boasts impressive performance benchmarks, ideal for efficiently handling high-traffic backend systems and APIs.

  2. Minimalistic and Lightweight: The design philosophy of Gin is to keep things simple and minimal. It has a small memory footprint and doesn't introduce unnecessary abstractions, making the learning curve smoother for developers.

  3. Fast Router: Gin's router is highly optimized and can quickly handle routing tasks, making it efficient even with complex routing requirements.

  4. Middleware Support: Gin provides a robust middleware system, allowing developers to extend functionalities, such as authentication, logging, rate-limiting, and more, in a modular way.

  5. Easy to Learn: If you are familiar with Go, starting with Gin is straightforward. Its API is clean, and the official documentation is well-structured.

  6. Active Community: Gin has a vibrant and active community that contributes to its development and supports other developers through forums and open-source contributions.

2

Building Your First Server in Gin

In this guide, you will learn how to build your first Gin server by learning how to install and setup the Gin framework.

3 min read

Installation and Setup

To start with Gin, you must have Go installed on your system. If you haven't installed Go yet, visit the official Go website for instructions. You might also need to learn the Go Essentials to understand Go syntax if you don’t.

Once you have Go installed, you can set up Gin in your project by using the following steps:

  1. Create a New Go Module: In Go, it is recommended to work with modules. Create a new directory for your Gin project and initialize a Go module:

mkdir gin-be
cd gin-be
go mod init github.com/your-username/gin-be
  1. Install Gin Package: You can use go get to install the Gin package and its dependencies:

go get -u github.com/gin-gonic/gin
  1. Import Gin in Your Code: You can start writing your backend application using Gin. Import the Gin package in your main Go file:

package main

import (
	"github.com/gin-gonic/gin"
)

func main() {
	// Your Gin application code goes here
}

With these steps completed, you have set up your Go project with Gin, and you are ready to start building your backend system using the powerful features provided by the Gin framework.

1.2 Your First Gin Server

Let's create a simple "Hello, World!" server using Gin to understand how easy it is to start with this framework.

package main

import (
	"github.com/gin-gonic/gin"
)

func main() {
	// Create a new Gin router
	router := gin.Default()

	// Define a route for the root URL
	router.GET("/", func(c *gin.Context) {
		c.String(200, "Hello, World!")
	})

	// Run the server on port 8080
	router.Run(":8080")
}

In this example, we imported the necessary Gin package and created a new Gin router using gin.Default(). We then defined a simple route for the root URL ("/") that responds with "Hello, World!".

To run this server, save the code in a file named main.go and execute the following command in your project directory:

go run main.go

Now, open your web browser and visit http://localhost:8080, and you should see the "Hello, World!" message.

building your first server in ginCongratulations! You have successfully set up your first Gin server and created a basic route. In the next sections of this guide, we will explore more advanced features of the Gin framework, including routing, middleware, and data handling, to build real-world backend systems.

Test your skills

If you feel confident enough, go ahead and add another GET request on the route /bye that says “Goodbye, World!” when you visit http://localhost:8080/bye.

2
Chapter 2

Chapter 2: The Framework

3 articles
~5 min
1

Middleware in Gin

In this section, we'll dive deeper into middleware as one of the features that make Gin a powerful web framework.

2 min read

Middleware in Gin

Middleware functions in Gin are essential components that intercept HTTP requests and responses. They can perform pre-processing tasks before a request reaches the designated route handler or post-processing tasks before the response is sent to the client.

Gin provides built-in middleware functions for common functionalities, such as logging, CORS handling, and recovery from panics. Additionally, developers can create custom middleware to extend Gin's capabilities according to their specific project requirements.

Using Built-in Middleware

Let's start by using some of the built-in middleware provided by Gin. For example, we'll add a logger middleware to log incoming requests:

package main

import (
	"github.com/gin-gonic/gin"
	"log"
	"time"
)

func LoggerMiddleware() gin.HandlerFunc {
	return func(c *gin.Context) {
		start := time.Now()
		c.Next()
		duration := time.Since(start)
		log.Printf("Request - Method: %s | Status: %d | Duration: %v", c.Request.Method, c.Writer.Status(), duration)
	}
}

func main() {
	router := gin.Default()

	// Use our custom logger middleware
	router.Use(LoggerMiddleware())

	router.GET("/", func(c *gin.Context) {
		c.String(200, "Hello, World!")
	})

	router.Run(":8080")
}

In this example, we defined a LoggerMiddleware function that calculates the duration of each request and logs the method, status, and duration. We then used router.Use() to apply our custom logger middleware to all routes.

Creating Custom Middleware

Developers often need to implement custom middleware for project-specific requirements. Custom middleware can handle tasks like authentication, data validation, rate limiting, and more. Let's create an example of a custom authentication middleware:

package main

import (
	"github.com/gin-gonic/gin"
)

func AuthMiddleware() gin.HandlerFunc {
	// In a real-world application, you would perform proper authentication here.
	// For the sake of this example, we'll just check if an API key is present.
	return func(c *gin.Context) {
		apiKey := c.GetHeader("X-API-Key")
		if apiKey == "" {
			c.AbortWithStatusJSON(401, gin.H{"error": "Unauthorized"})
			return
		}
		c.Next()
	}
}

func main() {
	router := gin.Default()

	// Use our custom authentication middleware for a specific group of routes
	authGroup := router.Group("/api")
	authGroup.Use(AuthMiddleware())
	{
		authGroup.GET("/data", func(c *gin.Context) {
			c.JSON(200, gin.H{"message": "Authenticated and authorized!"})
		})
	}

	router.Run(":8080")
}

In this example, we created a AuthMiddleware function that checks for an API key in the request headers. If the API key is missing, we return a 401 Unauthorized response. Otherwise, the request is allowed to proceed to the designated route handler.

2

Routing in Gin

In this article, we'll dive deeper into routing as one feature that makes Gin a powerful web framework. These concepts are fundamental to building robust backend systems using Gin.

2 min read

Routing and Grouping

In Gin, routing is mapping incoming HTTP requests to specific route handlers. The router matches the URL path and HTTP method of the request to find the appropriate handler to execute.

Basic Routing

In Chapter 1, we saw an example of basic routing. Here's a more extensive example that demonstrates different types of routes:

package main

import (
	"github.com/gin-gonic/gin"
)

func main() {
	router := gin.Default()

	// Basic route
	router.GET("/", func(c *gin.Context) {
		c.String(200, "Hello, World!")
	})

	// Route with URL parameters
	router.GET("/users/:id", func(c *gin.Context) {
		id := c.Param("id")
		c.String(200, "User ID: "+id)
	})

	// Route with query parameters
	router.GET("/search", func(c *gin.Context) {
		query := c.DefaultQuery("q", "default-value")
		c.String(200, "Search query: "+query)
	})

	router.Run(":8080")
}

In this example, we have three routes:

  1. The root URL ("/") responds with "Hello, World!".

  2. The "/users/:id" URL path captures the "id" parameter from the URL and displays it in the response.

  3. The "/search" URL path expects a query parameter "q", which is set to "default-value" if not provided.

Route Groups

Gin allows you to group related routes, which makes the code more organized and easier to maintain. Let's see an example of route grouping:

package main

import (
	"github.com/gin-gonic/gin"
)

func main() {
	router := gin.Default()

	// Public routes (no authentication required)
	public := router.Group("/public")
	{
		public.GET("/info", func(c *gin.Context) {
			c.String(200, "Public information")
		})
		public.GET("/products", func(c *gin.Context) {
			c.String(200, "Public product list")
		})
	}

	// Private routes (require authentication)
	private := router.Group("/private")
	private.Use(AuthMiddleware())
	{
		private.GET("/data", func(c *gin.Context) {
			c.String(200, "Private data accessible after authentication")
		})
		private.POST("/create", func(c *gin.Context) {
			c.String(200, "Create a new resource")
		})
	}

	router.Run(":8080")
}

We created two route groups in this example: "public" and "private". Routes inside the "public" group are accessible without authentication, while routes inside the "private" group require authentication, as specified by the AuthMiddleware.

Route grouping allows you to apply middleware and other configurations to specific groups of routes, making it a powerful feature for managing different parts of your backend system.

3

Controllers and Handlers in Gin

In this article, we'll dive deeper into controllers and handlers as one feature that makes Gin a powerful web framework. These concepts are fundamental to building robust backend systems using Gin.

1 min read

Controllers and Handlers

As your backend application grows, handling all the business logic in route handlers becomes unwieldy. To improve code organization and maintainability, Gin encourages using controllers to handle business logic separately from route handlers.

Separating Business Logic from Controllers

Let's create a simple example where we extract the business logic into a controller:

package main

import (
	"github.com/gin-gonic/gin"
)

// UserController represents a user-related controller
type UserController struct{}

// GetUserInfo is a controller method to get user information
func (uc *UserController) GetUserInfo(c *gin.Context) {
	userID := c.Param("id")
	// Fetch user information from the database or other data source
	// For simplicity, we'll just return a JSON response.
	c.JSON(200, gin.H{"id": userID, "name": "John Doe", "email": "[email protected]"})
}

func main() {
	router := gin.Default()

	userController := &UserController{}

	// Route using the UserController
	router.GET("/users/:id", userController.GetUserInfo)

	router.Run(":8080")
}

In this example, we created a UserController struct with a GetUserInfo method to handle user-related logic. This method is the route handler for the "/users/:id" route. As your application grows, you can add more methods to the UserController to handle various user-related tasks.

Separating business logic into controllers makes the codebase cleaner and more organized, improving readability and maintainability.

3
Chapter 3

Chapter 3: Building with Gin

1 articles
~3 min
1

Milestone project: To-do app with Gin

To solidify what we have learned thus far, let’s build a minimalistic CRUD app with Gin. It will be a To-do app that allows users to create, delete, update, and manage a database record of to-do tasks. Let’s get started:

3 min read

Milestone project: To-do app with Gin

To solidify what we have learned thus far, let’s build a minimalistic CRUD app with Gin. It will be a To-do app that allows users to create, delete, update, and manage a database record of to-do tasks. Let’s get started:

package main

import (
	"fmt"
	"github.com/gin-gonic/gin"
	"gorm.io/driver/sqlite"
	"gorm.io/gorm"
)

type Todo struct {
	gorm.Model
	Title       string `json:"title"`
	Description string `json:"description"`
}

func main() {
	router := gin.Default()

	// Connect to the SQLite database
	db, err := gorm.Open(sqlite.Open("todo.db"), &gorm.Config{})
	if err != nil {
		panic("failed to connect database")
	}

	// Auto-migrate the Todo model to create the table
	db.AutoMigrate(&Todo{})

	// Route to create a new Todo
	router.POST("/todos", func(c *gin.Context) {
		var todo Todo
		if err := c.ShouldBindJSON(&todo); err != nil {
			c.JSON(400, gin.H{"error": "Invalid JSON data"})
			return
		}

		// Save the Todo to the database
		db.Create(&todo)

		c.JSON(200, todo)
	})

	// Route to get all Todos
	router.GET("/todos", func(c *gin.Context) {
		var todos []Todo

		// Retrieve all Todos from the database
		db.Find(&todos)

		c.JSON(200, todos)
	})

	// Route to get a specific Todo by ID
	router.GET("/todos/:id", func(c *gin.Context) {
		var todo Todo
		todoID := c.Param("id")

		// Retrieve the Todo from the database
		result := db.First(&todo, todoID)
		if result.Error != nil {
			c.JSON(404, gin.H{"error": "Todo not found"})
			return
		}

		c.JSON(200, todo)
	})

	// Route to update a Todo by ID
	router.PUT("/todos/:id", func(c *gin.Context) {
		var todo Todo
		todoID := c.Param("id")

		// Retrieve the Todo from the database
		result := db.First(&todo, todoID)
		if result.Error != nil {
			c.JSON(404, gin.H{"error": "Todo not found"})
			return
		}

		var updatedTodo Todo
		if err := c.ShouldBindJSON(&updatedTodo); err != nil {
			c.JSON(400, gin.H{"error": "Invalid JSON data"})
			return
		}

		// Update the Todo in the database
		todo.Title = updatedTodo.Title
		todo.Description = updatedTodo.Description
		db.Save(&todo)

		c.JSON(200, todo)
	})

	// Route to delete a Todo by ID
	router.DELETE("/todos/:id", func(c *gin.Context) {
		var todo Todo
		todoID := c.Param("id")

		// Retrieve the Todo from the database
		result := db.First(&todo, todoID)
		if result.Error != nil {
			c.JSON(404, gin.H{"error": "Todo not found"})
			return
		}

		// Delete the Todo from the database
		db.Delete(&todo)

		c.JSON(200, gin.H{"message": fmt.Sprintf("Todo with ID %s deleted", todoID)})
	})

	router.Run(":8080")
}

In this Todo app, we've defined a Todo struct and created routes for creating, reading, updating, and deleting Todo items. The routes interact with the SQLite database to perform CRUD operations.

Remember to install the required GORM and SQLite packages:

go get -u gorm.io/gorm
go get -u gorm.io/driver/sqlite

Now, run the application:

go run main.go

If you visit http://localhost:8080/todos you will get a Status OK message from Postman or cURL:

Untitled (15).png
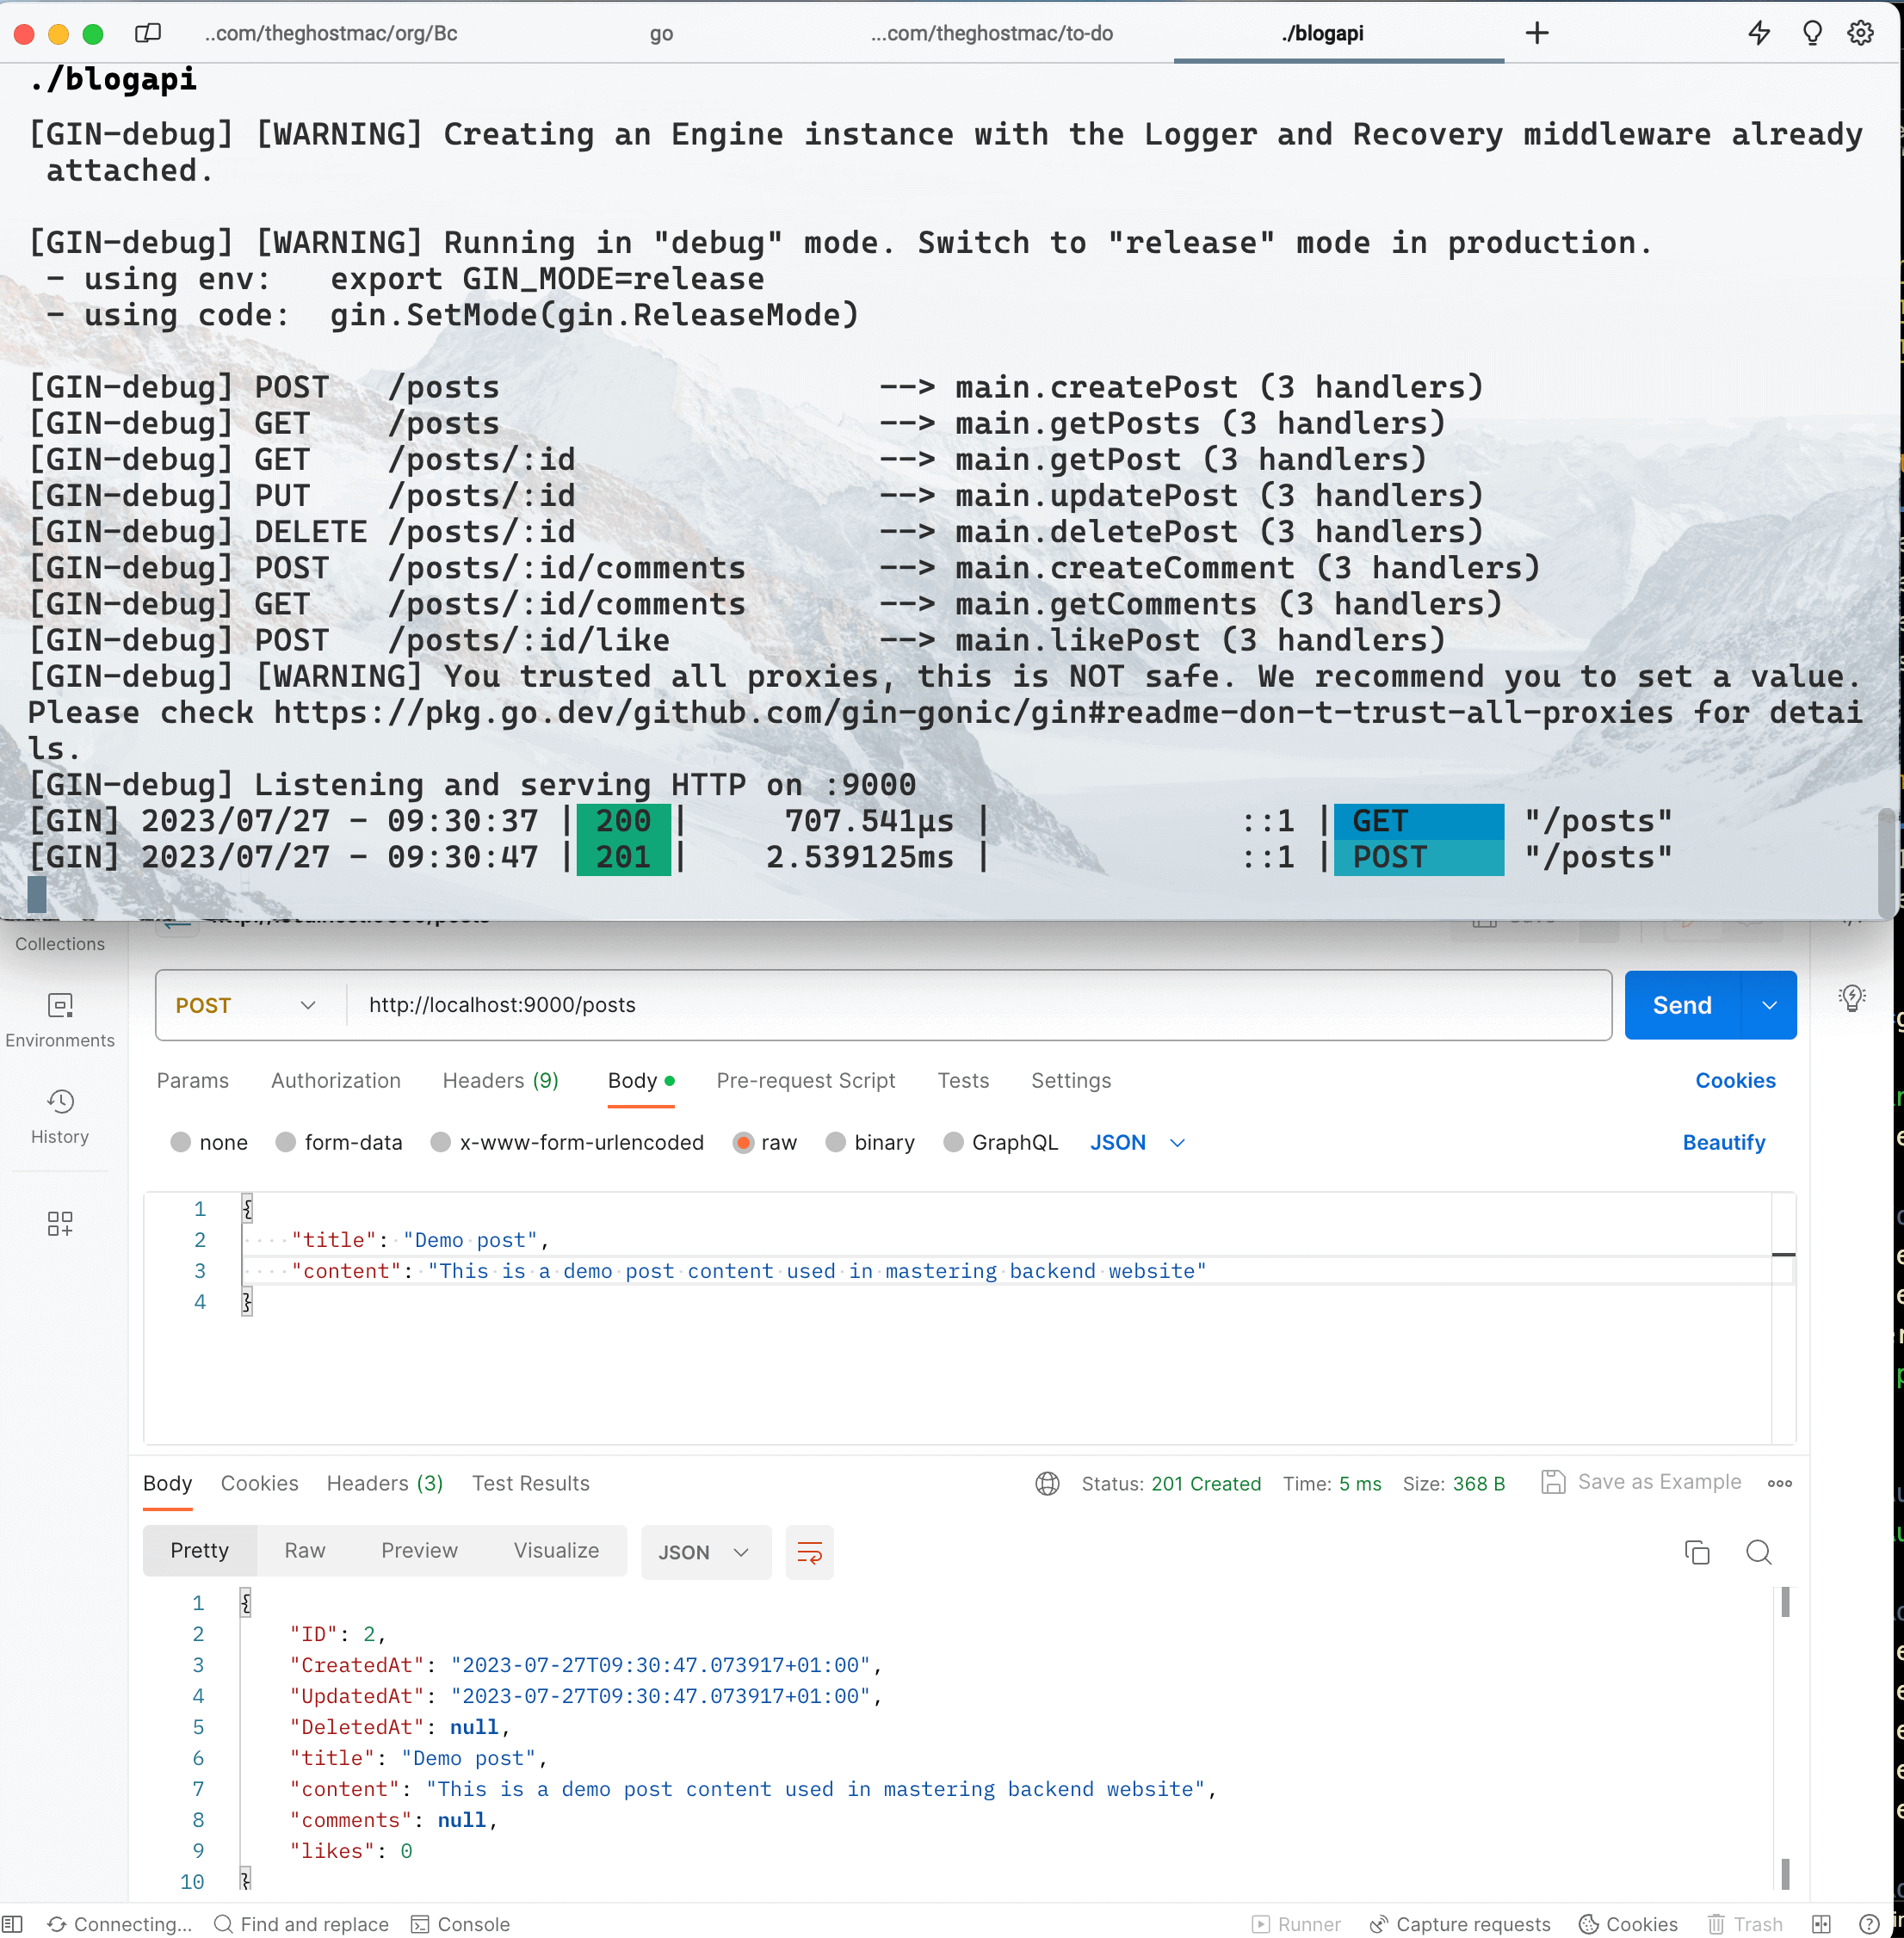
If you wish to test the POST feature, add a JSON title and description in POST mode, and then switch to GET to see that it works:

Untitled (16).pngYou can try the DELETE and PUT methods too. With this implementation, you have a simple Todo app using Gin with basic database integration. You can use tools like curl, Postman, or similar API testing tools to interact with the endpoints and manage your Todo list.

4
Chapter 4

Chapter 4: Data Handling and Advanced Functionality

3 articles
~7 min
1

Request Handling and Validation in Gin

When building backend systems, handling incoming data from clients is essential. Gin provides simple and efficient methods to parse and validate request data, including JSON, form data, query parameters, and URL parameters.

2 min read

Request Handling and Validation

When building backend systems, handling incoming data from clients is essential. Gin provides simple and efficient methods to parse and validate request data, including JSON, form data, query parameters, and URL parameters.

Parsing JSON Data

We can use the method to parse JSON data sent in the request body. Let's see an example:

package main

import (
	"github.com/gin-gonic/gin"
)

type User struct {
	ID    int    `json:"id" form:"id"`
	Name  string `json:"name" form:"name"`
	Email string `json:"email" form:"email"`
}

func main() {
	router := gin.Default()

	// Handle JSON data
	router.POST("/json", func(c *gin.Context) {
		var user User
		if err := c.ShouldBindJSON(&user); err != nil {
			c.JSON(400, gin.H{"error": "Invalid JSON data"})
			return
		}
		c.JSON(200, user)
	})

	// Handle form data
	router.POST("/form", func(c *gin.Context) {
		var user User
		if err := c.ShouldBind(&user); err != nil {
			c.JSON(400, gin.H{"error": "Invalid form data"})
			return
		}
		c.JSON(200, user)
	})

	router.Run(":8080")
}

In this example, we defined a User struct with JSON and form tags to map the request data to the struct fields. We then created two routes: "/json" for handling JSON data and "/form" for handling form data. Both routes use ShouldBindJSON and ShouldBind to parse the request data into the User struct.

Handling Query Parameters and URL Parameters

Query parameters and URL parameters are common in web applications for passing additional data to the server. Let's see an example of how to handle query parameters and URL parameters in Gin:

package main

import (
	"github.com/gin-gonic/gin"
)

func main() {
	router := gin.Default()

	// Handle query parameters
	router.GET("/search", func(c *gin.Context) {
		query := c.DefaultQuery("q", "default-value")
		c.String(200, "Search query: "+query)
	})

	// Handle URL parameters
	router.GET("/users/:id", func(c *gin.Context) {
		userID := c.Param("id")
		c.String(200, "User ID: "+userID)
	})

	router.Run(":8080")
}

In this example, the "/search" route handles the "q" query parameter, while the "/users/:id" route captures the "id" URL parameter.

2

Database Integration in Gin

Integrating a database with your Gin application allows you to store and retrieve data persistently. Gin doesn't restrict you to any specific database; you can use SQL databases like PostgreSQL, MySQL, or NoSQL databases like MongoDB. Let's create an example using the popular SQLite database:

2 min read

Database Integration

Integrating a database with your Gin application allows you to store and retrieve data persistently. Gin doesn't restrict you to any specific database; you can use SQL databases like PostgreSQL, MySQL, or NoSQL databases like MongoDB. Let's create an example using the popular SQLite database:

package main

import (
	"github.com/gin-gonic/gin"
	"gorm.io/driver/sqlite"
	"gorm.io/gorm"
)

type User struct {
	gorm.Model
	Name  string
	Email string
}

func main() {
	router := gin.Default()

	// Connect to the SQLite database
	db, err := gorm.Open(sqlite.Open("test.db"), &gorm.Config{})
	if err != nil {
		panic("failed to connect database")
	}

	// Auto-migrate the User model to create the table
	db.AutoMigrate(&User{})

	// Create a new user
	router.POST("/users", func(c *gin.Context) {
		var user User
		if err := c.ShouldBindJSON(&user); err != nil {
			c.JSON(400, gin.H{"error": "Invalid JSON data"})
			return
		}

		// Save the user to the database
		db.Create(&user)

		c.JSON(200, user)
	})

	// Get a user by ID
	router.GET("/users/:id", func(c *gin.Context) {
		var user User
		userID := c.Param("id")

		// Retrieve the user from the database
		result := db.First(&user, userID)
		if result.Error != nil {
			c.JSON(404, gin.H{"error": "User not found"})
			return
		}

		c.JSON(200, user)
	})

	router.Run(":8080")
}

In this example, we used the GORM library, a popular ORM (Object-Relational Mapping) tool, to interact with the SQLite database.

We defined a User struct and created routes for creating a new user and fetching a user by ID. When you send a POST request to "/users" with JSON data, a new user will be saved to the database. Sending a GET request to "/users/:id" will retrieve the user with the specified ID.

Remember to install the required GORM and SQLite packages:

go get -u gorm.io/gorm
go get -u gorm.io/driver/sqlite

GORM provides a flexible and user-friendly way to work with databases in your Gin application, enabling you to build feature-rich backend systems easily.

3

Authentication and Authorization in Gin

Authentication is the process of verifying the identity of a user or client requesting your backend application. Authorization, conversely, is about determining what actions or resources a user can access once their identity is verified. Implementing robust authentication and authorization mechanisms is essential for securing your backend systems.

3 min read

Authentication and Authorization

Authentication is the process of verifying the identity of a user or client requesting your backend application. Authorization, conversely, is about determining what actions or resources a user can access once their identity is verified. Implementing robust authentication and authorization mechanisms is essential for securing your backend systems.

Implementing User Authentication with Gin

We'll use a common method to implement user authentication: JSON Web Tokens (JWT). JSON Web Tokens are a compact and self-contained way of representing user information as a set of claims. They are signed to ensure the information is not tampered with and can be verified with a secret key.

Let's implement JWT-based authentication in Gin:

package main

import (
	"github.com/gin-gonic/gin"
	"github.com/dgrijalva/jwt-go"
	"time"
)

const secretKey = "your-secret-key"

type User struct {
	ID       int    `json:"id"`
	Username string `json:"username"`
	Password string `json:"password"`
}

// Simulated user database
var users = []User{
	{ID: 1, Username: "john", Password: "password123"},
	{ID: 2, Username: "jane", Password: "letmein"},
}

// Custom claims for the JWT token
type Claims struct {
	Username string `json:"username"`
	jwt.StandardClaims
}

func createToken(username string) (string, error) {
	claims := &Claims{
		Username: username,
		StandardClaims: jwt.StandardClaims{
			ExpiresAt: time.Now().Add(time.Hour * 24).Unix(), // Token expires in 24 hours
		},
	}

	token := jwt.NewWithClaims(jwt.SigningMethodHS256, claims)
	return token.SignedString([]byte(secretKey))
}

func authenticate(username, password string) bool {
	for _, user := range users {
		if user.Username == username && user.Password == password {
			return true
		}
	}
	return false
}

func main() {
	router := gin.Default()

	router.POST("/login", func(c *gin.Context) {
		var credentials struct {
			Username string `json:"username"`
			Password string `json:"password"`
		}
		if err := c.ShouldBindJSON(&credentials); err != nil {
			c.JSON(400, gin.H{"error": "Invalid JSON data"})
			return
		}

		if !authenticate(credentials.Username, credentials.Password) {
			c.JSON(401, gin.H{"error": "Authentication failed"})
			return
		}

		token, err := createToken(credentials.Username)
		if err != nil {
			c.JSON(500, gin.H{"error": "Failed to create token"})
			return
		}

		c.JSON(200, gin.H{"token": token})
	})

	router.GET("/protected", authenticateMiddleware(), func(c *gin.Context) {
		// This route is protected and requires authentication.
		// The authenticateMiddleware will ensure that the request has a valid token.
		username := c.GetString("username")
		c.JSON(200, gin.H{"message": "Hello, " + username + "!"})
	})

	router.Run(":8080")
}

func authenticateMiddleware() gin.HandlerFunc {
	return func(c *gin.Context) {
		tokenString := c.GetHeader("Authorization")
		if tokenString == "" {
			c.JSON(401, gin.H{"error": "Authorization header missing"})
			c.Abort()
			return
		}

		token, err := jwt.ParseWithClaims(tokenString, &Claims{}, func(token *jwt.Token) (interface{}, error) {
			return []byte(secretKey), nil
		})

		if err != nil {
			c.JSON(401, gin.H{"error": "Invalid token"})
			c.Abort()
			return
		}

		if claims, ok := token.Claims.(*Claims); ok && token.Valid {
			c.Set("username", claims.Username)
			c.Next()
		} else {
			c.JSON(401, gin.H{"error": "Invalid token"})
			c.Abort()
			return
		}
	}
}

In this example, we implemented JWT-based authentication and used a simulated user database to validate user credentials. When a user sends a POST request to "/login" with valid credentials, the server issues a JWT token containing the user's username. The token is then returned to the user, who must include it in the "Authorization" header for future requests.

We also created an authenticateMiddleware to protect the "/protected" route. This middleware checks the validity of the JWT token sent in the "Authorization" header before allowing access to the protected route. If the token is valid, the user's username is added to the context, allowing the route handler to retrieve it for further processing.

With JWT-based authentication, you can now control access to different parts of your backend system based on the user's identity.

The next chapter focus on error handling, logging, and caching, crucial aspects of building reliable and efficient backend applications with Gin. Before that, let’s do a milestone project:

5
Chapter 5

Chapter 5: Error Handling, Logging, and Caching

3 articles
~10 min
1

Error Handling and Logging in Gin

Proper error handling is essential for identifying and resolving issues in your backend application. Gin provides efficient mechanisms to handle errors and log important information for debugging and monitoring.

2 min read

Error Handling and Logging

Proper error handling is essential for identifying and resolving issues in your backend application. Gin provides efficient mechanisms to handle errors and log important information for debugging and monitoring.

Custom Error Handling

Gin allows you to define custom error handlers to centralize error responses. Let's create an example that demonstrates custom error handling:

package main

import (
	"github.com/gin-gonic/gin"
)

func main() {
	router := gin.Default()

	router.GET("/divide/:a/:b", func(c *gin.Context) {
		a := c.Param("a")
		b := c.Param("b")

		// Simulate a division by zero error
		if b == "0" {
			c.JSON(400, gin.H{"error": "Division by zero"})
			return
		}

		c.JSON(200, gin.H{"result": a / b})
	})

	router.Run(":8080")
}

In this example, we created a route that performs division. If the provided divisor "b" is "0," the server will respond with a custom error message. This way, we handle the division by zero error gracefully.

Logging Requests and Responses

Logging is crucial for understanding the behavior of your backend application and diagnosing issues. Gin simplifies logging by providing a built-in logging middleware. Let's add logging to the previous example:

package main

import (
	"github.com/gin-gonic/gin"
	"log"
	"os"
	"time"
)

func LoggerMiddleware() gin.HandlerFunc {
	logger := log.New(os.Stdout, "", log.LstdFlags)

	return func(c *gin.Context) {
		start := time.Now()
		c.Next()
		duration := time.Since(start)
		logger.Printf("Request - Method: %s | Status: %d | Duration: %v", c.Request.Method, c.Writer.Status(), duration)
	}
}

func main() {
	router := gin.Default()

	// Use the built-in logger middleware
	router.Use(LoggerMiddleware())

	router.GET("/divide/:a/:b", func(c *gin.Context) {
		a := c.Param("a")
		b := c.Param("b")

		// Simulate a division by zero error
		if b == "0" {
			c.JSON(400, gin.H{"error": "Division by zero"})
			return
		}

		c.JSON(200, gin.H{"result": a / b})
	})

	router.Run(":8080")
}

In this example, we added a custom logger middleware using the log package. The middleware logs details about each request, including the HTTP method, status code, and duration. This provides valuable insights into the performance and behavior of your backend application.

2

Caching and Performance in Gin

Caching is a technique to store frequently accessed data in memory, reducing the need to fetch it from the database or perform expensive calculations repeatedly. Caching can significantly improve the performance and responsiveness of your backend application.

2 min read

Caching and Performance

Caching is a technique to store frequently accessed data in memory, reducing the need to fetch it from the database or perform expensive calculations repeatedly. Caching can significantly improve the performance and responsiveness of your backend application.

Gin doesn't include built-in caching mechanisms, but you can easily integrate popular caching solutions like Redis with your Gin application. Let's see an example of how to implement caching with Redis:

package main

import (
	"github.com/gin-gonic/gin"
	"github.com/go-redis/redis/v8"
	"golang.org/x/net/context"
)

func main() {
	router := gin.Default()

	// Connect to the Redis server
	rdb := redis.NewClient(&redis.Options{
		Addr: "localhost:6379",
	})

	router.GET("/products/:id", func(c *gin.Context) {
		id := c.Param("id")

		// Check if the data exists in the cache
		val, err := rdb.Get(context.Background(), "product:"+id).Result()
		if err == nil {
			// Cache hit
			c.JSON(200, gin.H{"product": val})
			return
		}

		// Fetch the data from the database
		product := getProductFromDatabase(id)

		// Store the data in the cache
		err = rdb.Set(context.Background(), "product:"+id, product, 0).Err()
		if err != nil {
			// Failed to cache the data, continue without caching
			c.JSON(200, gin.H{"product": product})
		} else {
			c.JSON(200, gin.H{"product": product})
		}
	})

	router.Run(":8080")
}

func getProductFromDatabase(id string) string {
	// Simulate fetching product data from the database
	// In a real-world application, this function would interact with the database
	// to fetch the product with the specified ID.
	// For simplicity, we'll return a static string.
	return "Product ID: " + id
}

We used the popular Redis database for caching product data in this example. When a user requests product information with a specific ID, the server checks if the data exists in the cache. If it's a cache hit, the server returns the cached data. Otherwise, it fetches the data from the database, stores it in the cache for future use, and then returns it to the user.

With caching in place, subsequent requests for the same product will be significantly faster, as the data will be served directly from the cache instead of querying the database.

3

Building A Blog API with Gin

We will build a blog API in Gin to finalize all we have learned. A code walkthrough below explains what every block of code does.

6 min read

A Blog API with Gin

We will build a blog API in Gin to finalize all we have learned. Let's go through the process of building a Blog API step by step to understand its functionality and everything we have learned thus far:

  1. Imports:

    We import required packages, including "github.com/gin-gonic/gin" for the Gin web framework, "gorm.io/driver/sqlite" and "gorm.io/gorm" for the GORM ORM, "github.com/dgrijalva/jwt-go" for JWT authentication, and "net/http" and "time" for HTTP and time-related functionalities.

    package main
    
    import (
    	"github.com/dgrijalva/jwt-go"
    	"github.com/gin-gonic/gin"
    	"gorm.io/driver/sqlite"
    	"gorm.io/gorm"
    	"net/http"
    	"strings"
    	"time"
    	"fmt"
    )
    
  2. Model Structs:

    We define two model structs: Post and Comment. These structs represent blog posts and comments in the database and have corresponding JSON tags for easier serialization and deserialization.

    type Post struct {
    	gorm.Model
    	Title    string    `json:"title" binding:"required"`
    	Content  string    `json:"content" binding:"required"`
    	Comments []Comment `json:"comments"`
    	Likes    int       `json:"likes"`
    }
    
    type Comment struct {
    	gorm.Model
    	PostID  uint   `json:"-"`
    	Content string `json:"content" binding:"required"`
    }
    
  3. JWT Signing Key:

    We define a jwtKey variable as the secret key used to sign and validate JWT tokens. Make sure to replace "your-secret-key" with a strong and unique secret key in a real-world scenario.

    var jwtKey = []byte("your-secret-key")
    

    We also defined a global variable to handle the database migration:

    var db *gorm.DB
    
  4. JWT Token Generation Function:

    The generateToken function creates a new JWT token for a given userID. It sets an expiration time (e.g., 1 hour) and includes the user_id claim in the token. The token is then signed using the jwtKey.

    func generateToken(userID uint) (string, error) {
    	// Set the token expiration time (e.g., 1 hour)
    	expirationTime := time.Now().Add(1 * time.Hour)
    
    	// Create the JWT claims, which include the user ID and expiration time
    	claims := jwt.MapClaims{
    		"user_id": userID,
    		"exp":     expirationTime.Unix(),
    	}
    
    	// Create the token using the claims and the signing key
    	token := jwt.NewWithClaims(jwt.SigningMethodHS256, claims)
    	tokenString, err := token.SignedString(jwtKey)
    	if err != nil {
    		return "", err
    	}
    
    	return tokenString, nil
    }
    
  5. User Model:

    We add a User struct to represent a user in the database. The user has a Username and a Password, and these fields are required for login authentication.

    type User struct {
    	gorm.Model
    	Username string `json:"username" binding:"required"`
    	Password string `json:"password" binding:"required"`
    }
    
  6. Main Function:

    We initialize the Gin router and connect to the SQLite database using GORM.

    func main() {
    	router := gin.Default()
    
    	// Connect to the SQLite database
    	var err error
    	db, err = gorm.Open(sqlite.Open("blog.db"), &gorm.Config{})
    	if err != nil {
    		panic("failed to connect database")
    	}
    
    	// Auto-migrate the Post and User models to create the tables
    	db.AutoMigrate(&Post{}, &User{})
    
    	// Routes for blog posts
    	router.POST("/posts", createPost)
    	router.GET("/posts", getPosts)
    	router.GET("/posts/:id", getPost)
    	router.PUT("/posts/:id", updatePost)
    	router.DELETE("/posts/:id", deletePost)
    
    	// Routes for comments
    	router.POST("/posts/:id/comments", createComment)
    	router.GET("/posts/:id/comments", getComments)
    
    	// Route for liking a post
    	router.POST("/posts/:id/like", likePost)
    
    	// Route for user login
    	router.POST("/login", func(c *gin.Context) {
    		var user User
    		if err := c.ShouldBindJSON(&user); err != nil {
    			c.JSON(http.StatusBadRequest, gin.H{"error": "Invalid request"})
    			return
    		}
    
    		var existingUser User
    		result := db.Where("username = ?", user.Username).First(&existingUser)
    		if result.Error != nil || user.Password != existingUser.Password {
    			c.JSON(http.StatusUnauthorized, gin.H{"error": "Invalid credentials"})
    			return
    		}
    
    		tokenString, err := generateToken(existingUser.ID)
    		if err != nil {
    			c.JSON(http.StatusInternalServerError, gin.H{"error": "Error generating token"})
    			return
    		}
    
    		c.JSON(http.StatusOK, gin.H{"token": tokenString})
    	})
    
    	router.Run(":8080")
    }
    
  7. User Login Route:

    In the main function above, we created a /login route to handle user login. The client sends a POST request with the user's credentials (username and password) in the request body. We validate the credentials against the existing user in the database and generate a JWT token upon successful login. The token is then returned in the response.

  8. JWT Authentication Middleware:

    The authMiddleware function is a Gin middleware that protects routes requiring authentication. It checks for a valid JWT token in the Authorization header, verifies the token's validity and signing method, and then allows access to the route if the token is valid.

    func authMiddleware() gin.HandlerFunc {
    	return func(c *gin.Context) {
    		authHeader := c.GetHeader("Authorization")
    		if authHeader == "" {
    			c.JSON(http.StatusUnauthorized, gin.H{"error": "Authentication required"})
    			c.Abort()
    			return
    		}
    
    		authParts := strings.Fields(authHeader)
    		if len(authParts) != 2 || authParts[0] != "Bearer" {
    			c.JSON(http.StatusUnauthorized, gin.H{"error": "Invalid token format"})
    			c.Abort()
    			return
    		}
    
    		tokenString := authParts[1]
    		token, err := jwt.Parse(tokenString, func(token *jwt.Token) (interface{}, error) {
    			// Validate the signing method
    			if token.Method != jwt.SigningMethodHS256 {
    				return nil, fmt.Errorf("unexpected signing method: %v", token.Header["alg"])
    			}
    
    			return jwtKey, nil
    		})
    
    		if err != nil || !token.Valid {
    			c.JSON(http.StatusUnauthorized, gin.H{"error": "Invalid token"})
    			c.Abort()
    			return
    		}
    
    		// Token is valid, continue to the next handler
    		c.Next()
    	}
    }
    
  9. Protected Routes:

    We add protected routes for blog posts, comments, and liking posts. To secure these routes, we use the authMiddleware to ensure the client provides a valid JWT token before accessing them.

    // Create a new blog post
    func createPost(c *gin.Context) {
    	var post Post
    	if err := c.ShouldBindJSON(&post); err != nil {
    		c.JSON(400, gin.H{"error": "Invalid JSON data"})
    		return
    	}
    
    	db.Create(&post)
    	c.JSON(201, post)
    }
    
    // Get all blog posts
    func getPosts(c *gin.Context) {
    	var posts []Post
    	db.Find(&posts)
    
    	c.JSON(200, posts)
    }
    
    // Get a specific blog post by ID
    func getPost(c *gin.Context) {
    	var post Post
    	postID := c.Param("id")
    
    	result := db.Preload("Comments").First(&post, postID)
    	if result.Error != nil {
    		c.JSON(404, gin.H{"error": "Post not found"})
    		return
    	}
    
    	c.JSON(200, post)
    }
    
    // Update a blog post by ID
    func updatePost(c *gin.Context) {
    	var post Post
    	postID := c.Param("id")
    
    	result := db.First(&post, postID)
    	if result.Error != nil {
    		c.JSON(404, gin.H{"error": "Post not found"})
    		return
    	}
    
    	var updatedPost Post
    	if err := c.ShouldBindJSON(&updatedPost); err != nil {
    		c.JSON(400, gin.H{"error": "Invalid JSON data"})
    		return
    	}
    
    	post.Title = updatedPost.Title
    	post.Content = updatedPost.Content
    	db.Save(&post)
    
    	c.JSON(200, post)
    }
    
    // Delete a blog post by ID
    func deletePost(c *gin.Context) {
    	var post Post
    	postID := c.Param("id")
    
    	result := db.First(&post, postID)
    	if result.Error != nil {
    		c.JSON(404, gin.H{"error": "Post not found"})
    		return
    	}
    
    	db.Delete(&post)
    
    	c.JSON(200, gin.H{"message": "Post deleted successfully"})
    }
    
    // Create a new comment for a blog post
    func createComment(c *gin.Context) {
    	var comment Comment
    	postID := c.Param("id")
    
    	if err := c.ShouldBindJSON(&comment); err != nil {
    		c.JSON(400, gin.H{"error": "Invalid JSON data"})
    		return
    	}
    
    	var post Post
    	result := db.First(&post, postID)
    	if result.Error != nil {
    		c.JSON(404, gin.H{"error": "Post not found"})
    		return
    	}
    
    	comment.PostID = post.ID
    	db.Create(&comment)
    
    	c.JSON(201, comment)
    }
    
    // Get all comments for a blog post
    func getComments(c *gin.Context) {
    	var comments []Comment
    	postID := c.Param("id")
    
    	db.Where("post_id = ?", postID).Find(&comments)
    
    	c.JSON(200, comments)
    }
    
    // Like a blog post
    func likePost(c *gin.Context) {
    	var post Post
    	postID := c.Param("id")
    
    	result := db.First(&post, postID)
    	if result.Error != nil {
    		c.JSON(404, gin.H{"error": "Post not found"})
    		return
    	}
    
    	post.Likes++
    	db.Save(&post)
    
    	c.JSON(200, post)
    }
    

By adding JWT authentication to the Blog API, we ensure that clients must log in and obtain a valid token to access protected routes. This improves security and allows for more controlled access to sensitive functionalities in the API. However, this implementation is a basic example, and in real-world scenarios, you should consider additional security measures, such as token expiration, token refresh, and securely storing user passwords.

You can build and run the app:

go build -o blog-api .
./blog-api

When you query the POST and GET methods with the correct parameters, you should find that it works as expected:

gin-result.png

6
Chapter 6

Conclusion: Gin

1 articles
~3 min
1

Conclusion Building a Todo API in Gin

Let's combine everything we've learned in this guide to build a simple Todo API using Gin. You'll implement user authentication, CRUD operations for todos, error handling, and logging.

3 min read

Go Further: Building a Todo API

Let's combine everything we've learned in this guide to build a simple Todo API using Gin. You'll implement user authentication, CRUD operations for todos, error handling, and logging.

In this project, you'll use SQLite as the database for simplicity. However, you can replace it with your preferred database.

// The complete code for the Todo API is quite extensive.
// To avoid exceeding the response limit, you will provide an overview of the implementation.
// The full code can be found in the following GitHub repository: [Todo API using Gin](<https://github.com/theghostmac/todo-api-with-gin>).

// The project structure will look like this:

// ├── main.go
// ├── controllers
// │   └── todo_controller.go
// ├── middleware
// │   └── auth_middleware.go
// ├── models
// │   └── todo.go
// └── utils
//     ├── database.go
//     ├── error_handler.go
//     └── logger.go

In the "models" directory, you will define the Todo struct to represent a Todo item. The struct includes fields such as ID, Title, Description, IsCompleted, and CreatedAt.

The "utils" package contains helper functions for managing the database connection, error handling, and logging.

The "middleware" package includes the AuthMiddleware to protect certain routes that require authentication. It uses JWT-based authentication to ensure users are authenticated before accessing protected routes.

The "controllers" package contains the TodoController, which handles CRUD operations for Todo items. It interacts with the database and uses the AuthMiddleware to protect certain routes.

You can start building the Todo API with the project structure in place. You'll create routes for user registration, user login, and CRUD operations for managing Todo items.

Here's a high-level overview of the project implementation:

  • Define the Todo struct in the "models" package.

  • Implement database functions in the "utils/database.go" to connect to SQLite and perform CRUD operations for Todo items.

  • Create the AuthMiddleware in the "middleware/auth_middleware.go" to handle JWT-based authentication.

  • Implement error handling and logging in the "utils/error_handler.go" and "utils/logger.go" files, respectively.

  • Build the TodoController in the "controllers/todo_controller.go" to handle CRUD operations for Todo items. The controller will use the database functions, authentication middleware, and error-handling utilities.

  • Define routes in the "main.go" file to handle user registration, user login, and CRUD operations for Todo items. Use the TodoController methods as route handlers and apply the AuthMiddleware to protect certain routes.

To test the Todo API, you can use tools like curl, Postman, or your favorite API testing tool. The API will allow users to register, login, create, read, update, and delete Todo items. Protected routes require users to provide a valid JWT token in the "Authorization" header.

Congratulations! You have now built a feature-rich Todo API using the powerful Gin web framework with authentication, CRUD operations, error handling, and caching. This project demonstrates how Gin enables you to create efficient and scalable backend systems for various real-world applications.

Congratulations!

You've completed the "Gin Tutorial: The Ultimate Guide (2023)" definitive guide

Enjoyed this article?

Subscribe to our newsletter for more backend engineering insights and tutorials.