Definitive Guide
5 chapters
~23 min

Actix Web: The Ultimate Guide (2023)

This is the most comprehensive tutorial on the Actix Web framework online.In this Actix Web tutorial, you will learn Actix Web from scratch to an advanced level. You will learn how to build and deploy your first Actix Web app.

SO
Solomon Eseme
Updated 12/17/2023
1
Chapter 1

Chapter 1: Complete Actix Overview

1 articles
~2 min
1

What is Actix Web?

This article will explore Rust's Actix web framework, a powerful and efficient tool for building web applications. We'll dive into the basics of Actix, its key features, and how to get started with backend web development using this framework.

2 min read

In recent years, web development has shifted towards more performant and reliable technologies.

One language that has gained traction for backend web development is Rust, known for its safety and speed.

Name

custom

Title

Rust Essentials

URL

https://masteringbackend.com/books/rust-essentials

description

This is the most comprehensive guide to the Rust Programming Language online. I’ll programmatically introduce you to Rust Programming Language in this Rust essential.

This article will explore Rust's Actix web framework, a powerful and efficient tool for building web applications. We'll dive into the basics of Actix, its key features, and how to get started with backend web development using this framework.

What is Actix Web

Actix Web is a high-performance, actor-based web framework for Rust. It is built on the Actix actor framework, which leverages Rust's concurrency and safety features. Actix Web is known for its exceptional speed, making it an excellent choice for building web applications that require low latency and high throughput.

Key Features of Actix Web

Actix web offers a wide range of features that make it a compelling choice for backend web development:

  1. Asynchronous and Non-blocking: Actix web fully embraces Rust's async/await system, allowing developers to write non-blocking code that efficiently handles many concurrent requests.

  2. Actor Model: Actix web is built on top of the Actix actor framework, which provides a powerful way to manage application state and handle concurrency. Actors are lightweight, isolated units of execution that can communicate with each other through messages.

  3. Middleware Support: Actix web supports middleware, which allows developers to add reusable functionality to the request/response handling pipeline. This makes implementing features like authentication, logging, and compression easy.

  4. WebSocket Support: Actix Web provides built-in support for WebSockets, enabling real-time communication between clients and the server.

  5. Extensible: Actix web is highly extensible, and developers can create custom components, middleware, and error handlers to tailor the framework to their specific needs.

  6. Testing: Actix web includes a robust testing framework that simplifies unit and integration testing of web applications.

  7. HTTP/2 and TLS: The framework supports HTTP/2 and TLS, ensuring secure and efficient client communication.

Now that we have an overview of Actix web's features, let's build a basic web application using this framework.

2
Chapter 2

Chapter 2: Getting Started with Actix Web

1 articles
~2 min
1

Getting Started with Actix Web

This chapter will teach you how to build your first Actix backend web server using the Rust programming language.

2 min read

Before you build web applications with Actix Web, you'll need to set up a Rust development environment. If you need to, follow the official Rust installation instructions at https://www.rust-lang.org/learn/get-started.

Once Rust is installed, you can create a new Rust project and add Actix web as a dependency in your Cargo.toml file:

[dependencies]
actix-web = "4.4.0"

Now, let's create a simple Actix web application step by step.

Creating a Basic Actix Web Application

Create a new Rust project with the following command:

cargo new actix_web_demo
cd actix_web_demo

Next, open your project's Cargo.toml file and add Actix web as a dependency, as mentioned earlier. Then, your Cargo.toml should look like this:

[dependencies]
actix-web = "4.4.0"

Creating the Application Entry Point

In Rust, the entry point of your application is the main function. Create a main.rs file in your project's root directory and define the main function:

use actix_web::{get, App, HttpServer, Responder};

#[get("/")]
async fn hello() -> impl Responder {
    "Hello, Actix web!"
}

#[actix_web::main]
async fn main() -> std::io::Result<()> {
    HttpServer::new(|| {
        App::new().service(hello)
    })
        .bind("127.0.0.1:8080")?
        .run()
        .await
}

In this code:

  • We import necessary items from Actix web.

  • We define a simple asynchronous function hello that responds with the string "Hello, Actix web!" when the root URL ("/") is accessed.

  • We create the main function which sets up an Actix web server. It uses HttpServer::new to configure the server and App::new to create an application with the hello route.

  • Finally, we bind the server to the address "127.0.0.1:8080" and run it asynchronously.

Running the Application

To run your Actix web application, use the following command from your project's root directory:

cargo run

This will start the Actix web server, and you'll see an output indicating that the server is running on 127.0.0.1:8080.

Accessing the Application

Open your web browser and navigate to http://localhost:8080. You should see the message "Hello, Actix web!" displayed in your browser. Alternatively, you can use the cURL tool to access the route from the terminal:

actix result

Congratulations! You've created a basic Actix web application.

3
Chapter 3

Chapter 3: Routing and Request Handling

1 articles
~3 min
1

Routing and Request Handling

Actix Web provides a flexible routing system that allows you to define routes and handle different HTTP requests (e.g., GET, POST, PUT, DELETE). Let's explore how to define routes and handle different requests in Actix web.

3 min read

Actix Web provides a flexible routing system that allows you to define routes and handle different HTTP requests (e.g., GET, POST, PUT, DELETE). Let's explore how to define routes and handle different requests in Actix web.

Defining Routes

In Actix web, you define routes using attributes like get, post, put, and delete on functions. Here's an example of defining multiple routes:

use actix_web::{get, post, put, delete, web, App, HttpResponse, HttpServer, Responder};

#[get("/")]
async fn index() -> impl Responder {
    HttpResponse::Ok().body("Welcome to the index page!")
}

#[post("/create")]
async fn create() -> impl Responder {
    HttpResponse::Created().body("Resource created successfully!")
}

#[put("/update")]
async fn update() -> impl Responder {
    HttpResponse::Ok().body("Resource updated successfully!")
}

#[delete("/delete")]
async fn delete() -> impl Responder {
    HttpResponse::NoContent().finish()
}

#[actix_web::main]
async fn main() -> std::io::Result<()> {
    HttpServer::new(|| {
        App::new()
            .service(index)
            .service(create)
            .service(update)
            .service(delete)
    })
    .bind("127.0.0.1:8080")?
    .run()
    .await
}

In this code, we've defined four routes:

  • index responds to GET requests to the root ("/") URL.

  • create responses to POST requests to the "/create" URL.

  • update responds to PUT requests to the "/update" URL.

  • delete responds to DELETE requests to the "/delete" URL.

Each route returns an appropriate HTTP response using Actix web's HttpResponse type.

Path Parameters

You can also define routes with dynamic path parameters using curly braces. For example:

use actix_web::{
    get, web, App, HttpResponse, HttpServer, Responder
};

#[get("/user/{id}/{name}")]
async fn user_info(info: web::Path<(u32, String)>) -> impl Responder {
    let (id, name) = info.into_inner();
    HttpResponse::Ok().body(format!("User ID: {}, Name: {}", id, name))
}

#[actix_web::main]
async fn main() -> std::io::Result<()> {
    HttpServer::new(|| {
        App::new()
            .service(user_info)
    })
        .bind("127.0.0.1:8080")?
        .run()
        .await
}

In this example, the user_info route takes two path parameters: id (a u32) and name (a String). When you access a URL like "/user/123/john", the values of id and name are extracted from the URL, and the route responds with "User ID: 123, Name: john".

Untitled (41).png

Request Data

To handle data sent in HTTP requests (e.g., JSON data in a POST request), you can use Actix web's data extraction features. Here's an example of parsing JSON data from a POST request:

use actix_web::{
    post, web, App, HttpResponse, HttpServer, Responder
};

#[derive(Debug, serde::Deserialize, serde::Serialize)]
struct User {
    username: String,
    email: String,
}

#[post("/create_user")]
async fn create_user(user: web::Json<User>) -> impl Responder {
    let new_user = user.into_inner();
    // Process the new user data (e.g., save it to a database)
    HttpResponse::Created().json(new_user)
}

#[actix_web::main]
async fn main() -> std::io::Result<()> {
    HttpServer::new(|| {
        App::new()
            .service(create_user)
    })
        .bind("127.0.0.1:8080")?
        .run()
        .await
}

In this code:

  • We define a User struct representing the JSON data we expect in the POST request.

  • The create_user route takes a type web::Json<User> parameter, automatically parsing JSON data from the request body into a User struct.

  • We can then process the parsed user data and return an appropriate HTTP response.

4
Chapter 4

Chapter 4: Advanced Actix Web Guide

6 articles
~16 min
1

Middleware in Actix web

Middleware in Actix web allows you to add functionality to the request/response handling pipeline. You can use middleware for tasks like authentication, logging, and compression. Actix Web provides built-in middleware and allows you to create custom middleware.

2 min read

Middleware in Actix web allows you to add functionality to the request/response handling pipeline. You can use middleware for tasks like authentication, logging, and compression. Actix Web provides built-in middleware and allows you to create custom middleware.

Using Built-in Middleware

To use built-in middleware, you can chain them together in your application setup. Here's an example of adding middleware for request logging and compression:

use actix_web::{middleware, App, HttpResponse, HttpServer, Responder};

async fn index() -> impl Responder {
    HttpResponse::Ok().body("Welcome to the index page!")
}

#[actix_web::main]
async fn main() -> std::io::Result<()> {
    HttpServer::new(|| {
        App::new()
            .wrap(middleware::Logger::default()) // Request logging middleware
            .wrap(middleware::Compress::default()) // Response compression middleware
            .service(index)
    })
    .bind("127.0.0.1:8080")?
    .run()
    .await
}

In this example, we use middleware::Logger::default() to add request logging middleware and middleware::Compress::default() to add response compression middleware. The .wrap() method adds these middleware components to the application.

Creating Custom Middleware

To create custom middleware, you define a function that takes an actix_web::dev::Service and returns a new Service. Here's a simple example of custom middleware that adds a custom header to the response:

use actix_service::Service;
use actix_web::{error, middleware, App, HttpResponse, HttpServer, Responder};

async fn index() -> impl Responder {
    HttpResponse::Ok().body("Welcome to the index page!")
}

async fn custom_middleware<S>(
    req: actix_web::dev::ServiceRequest,
    srv: S,
) -> Result<actix_web::dev::ServiceResponse, actix_web::Error>
where
    S: actix_service::Service<
        Request = actix_web::dev::ServiceRequest,
        Response = actix_web::dev::ServiceResponse,
        Error = actix_web::Error,
    >,
{
    // Call the inner service to get the response
    let mut response = srv.call(req).await?;

    // Add a custom header to the response
    response.headers_mut().insert(
        actix_web::http::header::HeaderName::from_static("X-Custom-Header"),
        actix_web::http::HeaderValue::from_static("MyCustomValue"),
    );

    Ok(response)
}

#[actix_web::main]
async fn main() -> std::io::Result<()> {
    HttpServer::new(|| {
        App::new()
            .wrap(middleware::Logger::default())
            .wrap_fn(custom_middleware) // Add custom middleware
            .service(index)
    })
    .bind("127.0.0.1:8080")?
    .run()
    .await
}

In this example, we define a custom middleware function custom_middleware, that takes a request and an inner service (srv). We call the inner service to get the response and add a custom header before returning it. The custom middleware is added to the application using .wrap_fn().

2

Authentication and Authorization in Actix Web

Authentication and authorization are important parts of backend engineering. We will see how to add user authentication to an application built with the Actix Web framework. Let’s create a JWT authentication session.

2 min read

Authentication and authorization are important parts of backend engineering. We will see how to add user authentication to an application built with the Actix Web framework. Let’s create a JWT authentication session. This assumes you are familiar with JWT, but we will try to be straightforward. We need to import several dependencies:

use actix_service::Service;
use actix_web::{dev::ServiceRequest, dev::ServiceResponse, Error};
use futures::future::{ok, Ready};
use jsonwebtoken::{decode, encode, Header, Validation};
use serde::{Deserialize, Serialize};

Then, we need to store our JWT secret key:

// JWT Secret Key
const SECRET_KEY: &[u8] = b"dear-jwt-secret-key";

Next, let’s have an object for representing and storing the user’s claim:

// Struct representing user claim
#[derive(Debug, Serialize, Deserialize)]
struct UserClaim {
    sub: String, // user ID
    exp: i64,    // expiration time
}

Great. Now, let’s create JWT tokens for the user:

pub fn create_token(user_id: &str) -> String {
    let claim = UserClaim {
        sub: user_id.to_owned(),
        exp: chrono::Utc::now().timestamp() + 3600, // token expires in an hour.
    };

    encode(&Header::default(), &claim, SECRET_KEY).unwrap()
}

Now, we will need to extract the user’s ID from the JWT token:

pub fn extract_user_id(token: &str) -> Result<String, jsonwebtoken::errors::Error> {
    let validation = Validation::default();
    let token_data = decode::<UserClaim>(token, SECRET_KEY, &validation)?;
    Ok(token_data.claims.sub)
}

And now, we need an Actix Web middleware that checks for a valid JWT token in the “Authorization” header, extracts the user ID, and then checks if the user exists in the web application:

pub struct AuthMiddleware;

impl<S, B> Service<ServiceRequest> for AuthMiddleware
    where
        S: Service<ServiceRequest, Response = ServiceResponse<B>, Error = Error>,
        B: 'static,
{
    type Response = ServiceResponse<B>;
    type Error = Error;
    type Future = Ready<Result<Self::Response, Self::Error>>;

    actix_service::forward_ready!(inner);

    fn call(&self, req: ServiceRequest) -> Self::Future {
        let auth_header = req.headers().get("Authorization");
        match auth_header {
            Some(header_value) => {
                let token = header_value.to_str().unwrap();
                match extract_user_id(token) {
                    Ok(user_id) => {
                        println!("User with ID {} is authenticated", user_id);
                        ok(req.into_response(ServiceResponse::new(req)))
                    }
                    Err(_) => {
                        println!("Invalid token");
                        ok(req.into_response(ServiceResponse::new(req)))
                    }
                }
            }
            None => {
                println!("No authorization header");
                ok(req.into_response(ServiceResponse::new(req)))
            }
        }
    }
}

Awesome, this wraps up our logic for authenticating and authorizing users in our Actix Web application. Let’s see how databases work in the next chapter.

3

Working with Databases in Actix Web

Database integration is a fundamental aspect of many web applications. Actix Web provides flexibility in working with databases, allowing you to choose the database that best suits your project's requirements. In this chapter, we'll explore the common patterns for working with databases in Actix Web.

2 min read

Database integration is a fundamental aspect of many web applications. Actix Web provides flexibility in working with databases, allowing you to choose the database that best suits your project's requirements. In this chapter, we'll explore the common patterns for working with databases in Actix Web.

Choosing a Database

Actix Web does not prescribe a specific database system. Instead, it allows you to use any database of your choice, including popular options like PostgreSQL, MySQL, SQLite, and NoSQL databases. Your choice of database will depend on factors such as data structure, scalability, and performance.

Database Connection Pools

To manage database connections efficiently, Actix Web commonly uses connection pools. Connection pooling helps reuse existing connections, reduce overhead, and improve performance. Libraries like sqlx for SQL databases or actix's actix-rt can be used for this purpose.

Connecting to a Database

The first step in working with a database in Actix Web is establishing a connection. The process typically involves configuring a database client with connection details such as the URL, username, and password.

Here's an example of connecting to a PostgreSQL database using the sqlx crate:

use sqlx::postgres::PgPoolOptions;

#[tokio::main]
async fn establish_connection() -> Result<(), sqlx::Error> {
    let pool = PgPoolOptions::new()
        .max_connections(5)
        .connect("postgres://postgres:password@localhost/test").await?;

    Ok(())
}

In this example, we use the sqlx crate to connect to a PostgreSQL database. The establish_connection function returns a connection pool (PgPoolOptions) that can be used throughout the application.

Handling Database Queries

Once a connection pool is established, you can execute SQL queries with the sqlx library. Let’s see an example of querying a PostgreSQL database using sqlx. To make use of the establish_connection function, we have to refactor the connection to return the Postgres connection:

async fn establish_connection() -> Result<Pool<Postgres>, sqlx::Error> {
    PgPoolOptions::new()
        .max_connections(5)
        .connect("postgres://postgres:password@localhost/test").await
}

Now, we can use it everywhere in our project. We will see how this is used in the milestone project at the end of this article. Let’s now see how to handle some errors in web applications using Actix Web’s error-handling mechanism.

4

Advanced Error Handling in Actix Web

Error handling is a crucial aspect of any web application. Actix Web provides a flexible mechanism for handling errors at various levels of your application.

2 min read

Error handling is a crucial aspect of any web application. Actix Web provides a flexible mechanism for handling errors at various levels of your application.

Handling Errors in Route Handlers

In route handlers, you can return errors using the Result type. Actix Web provides a set of error types, and you can use the Result type to return either a successful or an error response.

use actix_web::{error, get, App, HttpResponse, HttpServer, Responder};

#[get("/divide/{num}")]
async fn divide(num: i32) -> Result<HttpResponse, error::Error> {
    if num == 0 {
        // Return a custom error response for division by zero
        return Err(error::ErrorBadRequest("Division by zero"));
    }

    let result = 10 / num;
    Ok(HttpResponse::Ok().body(format!("Result: {}", result)))
}

#[actix_web::main]
async fn main() -> std::io::Result<()> {
    HttpServer::new(|| {
        App::new()
            .service(divide)
    })
    .bind("127.0.0.1:8080")?
    .run()
    .await
}

In this example, the divide route handler checks if the provided num is zero and returns a custom error response if it is. Otherwise, it calculates the result and returns an HTTP response.

Global Error Handling

Actix Web also allows you to define global error handlers that can catch errors at the application level. You can use the .configure() method to set up global error handlers.

use actix_web::{error, get, App, HttpResponse, HttpServer, Responder};

// Define a custom error type
#[derive(Debug)]
struct MyError;

impl std::fmt::Display for MyError {
    fn fmt(&self, f: &mut std::fmt::Formatter) -> std::fmt::Result {
        write!(f, "My custom error")
    }
}

impl actix_web::error::ResponseError for MyError {}

async fn divide(num: i32) -> Result<HttpResponse, MyError> {
    if num == 0 {
        // Return a custom error response for division by zero
        return Err(MyError);
    }

    let result = 10 / num;
    Ok(HttpResponse::Ok().body(format!("Result: {}", result)))
}

fn configure_error_handlers(cfg: &mut actix_web::web::ServiceConfig) {
    cfg.error(|err, _req| {
        let response = match err {
            // Handle MyError
            MyError => HttpResponse::BadRequest().body("Custom error: MyError"),
            _ => HttpResponse::InternalServerError().body("Internal Server Error"),
        };
        actix_web::Result::<_, actix_web::Error>::Err(error::InternalError::from_response(err, response))
    });
}

#[actix_web::main]
async fn main() -> std::io::Result<()> {
    HttpServer::new(|| {
        App::new()
            .configure(configure_error_handlers)
            .service(divide)
    })
    .bind("127.0.0.1:8080")?
    .run()
    .await
}

In this example:

  • We define a custom error type MyError, and implement the ResponseError trait.

  • The divide route handler returns Result<HttpResponse, MyError>, and if an error occurs, it returns an instance of MyError.

  • We configure global error handlers using the .configure() method. In the error handler, we match the error type and return an appropriate HTTP response.

  • We also use actix_web::Result::Err to convert the error into an actix_web::Error.

5

Implementing WebSocket in Actix Web

Actix Web provides built-in support for WebSockets, allowing you to implement real-time communication between the server and clients. Let's explore how to create a WebSocket endpoint in Actix web.

2 min read

Actix Web provides built-in support for WebSockets, allowing you to implement real-time communication between the server and clients. Let's explore how to create a WebSocket endpoint in Actix web.

Creating a WebSocket Endpoint

To create a WebSocket endpoint, you must define a route handler that upgrades an HTTP request to a WebSocket connection. Here's an example:

use actix::prelude::*;
use actix_web::{get, web, App, Error, HttpRequest, HttpResponse, HttpServer};
use actix_web_actors::ws;

struct WebSocket;

impl Actor for WebSocket {
    type Context = ws::WebsocketContext<Self>;

    fn started(&mut self, ctx: &mut Self::Context) {
        println!("WebSocket connection established");
    }

    fn stopped(&mut self, _: &mut Self::Context) {
        println!("WebSocket connection closed");
    }
}

impl StreamHandler<Result<ws::Message, ws::ProtocolError>> for WebSocket {
    fn handle(&mut self, msg: Result<ws::Message, ws::ProtocolError>, ctx: &mut Self::Context) {
        match msg {
            Ok(ws::Message::Text(text)) => {
                // Handle text messages from the client
                ctx.text(text);
            }
            Ok(ws::Message::Binary(bin)) => {
                // Handle binary messages from the client
                ctx.binary(bin);
            }
            _ => (),
        }
    }
}

#[get("/ws")]
async fn websocket_route(req: HttpRequest, stream: web::Payload) -> Result<HttpResponse, Error> {
    let resp = ws::start(WebSocket {}, &req, stream);
    resp.map_err(|_| Error::from(HttpResponse::InternalServerError()))
}

#[actix_web::main]
async fn main() -> std::io::Result<()> {
    HttpServer::new(|| {
        App::new()
            .service(websocket_route)
    })
    .bind("127.0.0.1:8080")?
    .run()
    .await
}

In this example:

  • We define a struct WebSocket that implements the Actor trait for WebSocket handling. It also implements the StreamHandler trait to handle incoming WebSocket messages.

  • The websocket_route route handler upgrades the HTTP request to a WebSocket connection using ws::start. It then returns a Result<HttpResponse, Error> where the response is either an upgraded WebSocket connection or an internal server error.

WebSocket Client Example

You can use a WebSocket client library or a browser-based WebSocket client to test the WebSocket endpoint. Here's a simple example using the websocket-client crate:

use websocket_client::sync::Client;
use std::thread;

fn main() {
    // Create a WebSocket client
    let client = Client::new("ws://127.0.0.1:8080/ws").unwrap();

    // Connect to the WebSocket server
    let mut conn = client.connect_insecure().unwrap();

    // Send a text message to the server
    conn.send_text("Hello, WebSocket!").unwrap();

    // Receive and print messages from the server
    thread::spawn(move || {
        for msg in conn.incoming_messages() {
            match msg.unwrap() {
                websocket_client::message::Message::Text(text) => {
                    println!("Received text message: {}", text);
                }
                websocket_client::message::Message::Binary(bin) => {
                    println!("Received binary message: {:?}", bin);
                }
                _ => (),
            }
        }
    });

    // Keep the main thread running
    loop {}
}

In this example, we create a WebSocket client, connect to the Actix web server's WebSocket endpoint, send a text message, and receive messages from the server.

6

Real-Time Chat App with Actix Web

The milestone project will be a real-time chat application. This application will showcase using Rust's Actix Web framework to handle real-time WebSocket communication, RESTful API interactions, middleware implementation, error handling, and database integration.

6 min read

The milestone project will be a real-time chat application. This application will showcase using Rust's Actix Web framework to handle real-time WebSocket communication, RESTful API interactions, middleware implementation, error handling, and database integration.

Features

  1. User Registration and Authentication: Users can register and authenticate using JWT tokens. This will demonstrate the use of middleware for authentication and handling JSON data in POST requests.

  2. Real-Time Messaging: Utilizing WebSockets, users can send and receive messages in real-time.

  3. Create, Read, Update, Delete (CRUD) Operations: Users can create chat rooms, retrieve chat history, update their profiles, and delete messages. This will involve routing and request handling.

  4. Database Integration: Store user data, chat messages, and room details. This will showcase database connectivity and queries.

  5. Error Handling: Implement custom error handling for scenarios like invalid requests, authentication failures, and server errors.

  6. Logging and Compression Middleware: Use built-in middleware for logging HTTP requests and compressing HTTP responses.

Building the project

Let’s name the project beechat. Create the project and add the following dependencies:

[dependencies]
actix-web = "4.4.0"
sqlx = { version = "0.7.3", features = ["postgres", "chrono", "runtime-tokio-native-tls"] }
jsonwebtoken = "9.1.0"
serde_json = "1.0.108"
chrono = {  version = "0.4.31", features = ["serde"] }
serde = { version = "1.0.193", features = ["derive"] }

Next, let’s setup a PostgreSQL database to have relevant tables the users, chat rooms, and messages. Our tables for these objects will utilize SQL statements like:

-- Create Users Table
CREATE TABLE users (
    id SERIAL PRIMARY KEY,
    username VARCHAR(255) UNIQUE NOT NULL,
    password_hash VARCHAR(255) NOT NULL,
    email VARCHAR(255) UNIQUE NOT NULL,
    created_at TIMESTAMP WITH TIME ZONE DEFAULT CURRENT_TIMESTAMP
);

-- Create Chat Rooms Table
CREATE TABLE chat_rooms (
    id SERIAL PRIMARY KEY,
    name VARCHAR(255) UNIQUE NOT NULL,
    created_at TIMESTAMP WITH TIME ZONE DEFAULT CURRENT_TIMESTAMP
);

-- Create Messages Table
CREATE TABLE messages (
    id SERIAL PRIMARY KEY,
    user_id INTEGER REFERENCES users(id),
    room_id INTEGER REFERENCES chat_rooms(id),
    content TEXT NOT NULL,
    created_at TIMESTAMP WITH TIME ZONE DEFAULT CURRENT_TIMESTAMP
);

Save these into a create_tables.sql file because we will be needing them below.

We will make use of sqlx to create the Postgres connection inside of the beechat/database.rs file:

use sqlx::{Pool, Postgres, Executor};
use std::env;

pub async fn create_database_pool() -> Result<Pool<Postgres>, sqlx::Error> {
    let database_url = env::var("DATABASE_URL").expect("DATABASE_URL must be set");
    sqlx::postgres::PgPoolOptions::new()
        .connect(&database_url)
        .await
}

pub async fn setup_database(pool: &Pool<Postgres>) -> Result<(), sqlx::Error> {
    // SQL statement to create table.
    let sql_query = include_str!("create_tables.sql");
    
    // Execute SQL
    pool.execute(sql_query).await?;
    
    Ok(())
}

Now, let’s initialize the database connection pool inside of main.rs:

use crate::beechat::database;

pub mod beechat;

#[actix_web::main]
async fn main() -> std::io::Result<()> {
   let create_db = create_database_pool().await.expect("Failed to create the database pool.");
    setup_database(&create_db).await.expect("Failed to setup the database.");
}

Next, let’s model the user, chat room, and messages being sent. We can do this inside of beechat/model.rs:

use chrono::{DateTime, Utc};
use serde::{Deserialize, Serialize};
use sqlx::FromRow;

#[derive(Debug, Serialize, Deserialize, FromRow)]
pub struct User {
    pub id: i32,
    pub username: String,
    pub password_hash: String,
    pub email: String,
    pub created_at: DateTime<Utc>,
}

#[derive(Debug, Serialize, Deserialize, FromRow)]
pub struct ChatRoom {
    pub id: i32,
    pub name: String,
    pub created_at: DateTime<Utc>,
}

#[derive(Debug, Serialize, Deserialize, FromRow)]
pub struct Message {
    pub id: i32,
    pub user_id: i32,
    pub room_id: i32,
    pub content: String,
    pub created_at: DateTime<Utc>,
}

That looks decent. Now, for their implementations:

impl User {
    pub async fn create(
        pool: &sqlx::Pool<sqlx::Postgres>,
        username: &str,
        password_hash: &str,
        email: &str,
    ) -> Result<(), sqlx::Error> {
        let tx = pool;
        sqlx::query("INSERT INTO users (username, password_hash, email) VALUES ($1, $2, $3)")
            .bind(username)
            .bind(password_hash)
            .bind(email)
            .execute(tx)
            .await?;

        tx.begin().await?.commit().await?;
        Ok(())
    }
}

impl ChatRoom {
    pub async fn create(pool: &sqlx::Pool<sqlx::Postgres>, name: &str) -> Result<(), sqlx::Error> {
        let tx = pool;
        sqlx::query("INSERT INTO chat_rooms (name) VALUES ($1)")
            .bind(name)
            .execute(tx)
            .await?;

        tx.begin().await?.commit().await?;
        Ok(())
    }
    pub async fn list_all(pool: &sqlx::Pool<sqlx::Postgres>) -> Result<Vec<Self>, sqlx::Error> {
        let chat_rooms = sqlx::query_as::<_, ChatRoom>("SELECT * FROM chat_rooms")
            .fetch_all(pool)
            .await?;

        Ok(chat_rooms)
    }
}

impl Message {
    pub async fn send(
        pool: &sqlx::Pool<sqlx::Postgres>,
        user_id: i32,
        room_id: i32,
        content: &str,
    ) -> Result<Self, sqlx::Error> {
        let tx = pool;
        let message = sqlx::query_as::<_, Message>(
            "INSERT INTO messages (user_id, room_id, content) VALUES ($1, $2, $3) RETURNING *",
        )
        .bind(user_id)
        .bind(room_id)
        .bind(content)
        .fetch_one(tx)
        .await?;

        tx.begin().await?.commit().await?;
        Ok(message)
    }
}

Looks decent! Now, we cannot just directly use them inside the main.rs file. We must create a web.rs file to house the HTTP functions supercharged by the Actix-Web framework.

Inside of web.rs, let’s add support for creating a new user. We will create a simpler structure for creating a new user and parsing the responses in JSON data format. Let’s do this:

use actix_web::{web, HttpResponse,Responder};
use serde::Deserialize;
use sqlx::Pool;
use sqlx::Postgres;
use crate::beechat::models::{ChatRoom, Message, User};

// Define user request data structure.
#[derive(Deserialize)]
pub struct UserCreationRequest {
    pub username: String,
    pub password_hash: String,
    pub email: String,
}

// Route for creating a new user.
pub async fn create_user(pool: web::Data<Pool<Postgres>>, user_info: web::Json<UserCreationRequest>) -> impl Responder {
    match User::create(&pool, &user_info.username, &user_info.password_hash, &user_info.email).await {
        Ok(user) =>HttpResponse::Ok().json(user),
        Err(e) => HttpResponse::InternalServerError().body(e.to_string()),
    }
}

Let’s do the same for the chat room and messages. For chat room:

// Define room request data struct.
#[derive(Deserialize)]
pub struct RoomCreationRequest {
    pub name: String,
}

// Route for creating a new chat room.
pub async fn create_chat_room(pool: web::Data<Pool<Postgres>>, room_info: web::Json<RoomCreationRequest>) -> impl Responder {
    match ChatRoom::create(&pool, &room_info.name).await {
        Ok(room) => HttpResponse::Ok().json(room),
        Err(e) => HttpResponse::InternalServerError().body(e.to_string()),
    }
}

And for messages:

// Define messages request data structure.
#[derive(Deserialize)]
pub struct MessageCreationRequest {
    pub user_id: i32,
    pub room_id: i32,
    pub content: String,
}

// Route for sending a message.
pub async fn send_message(pool: web::Data<Pool<Postgres>>, message_info: web::Json<MessageCreationRequest>) -> impl Responder {
    match Message::send(&pool, message_info.user_id, message_info.room_id, &message_info.content).await {
        Ok(message) => HttpResponse::Ok().json(message),
        Err(e) => HttpResponse::InternalServerError().body(e.to_string()),
    }
}

Now, let’s modify main.rs to make use of these new implementations:

use actix_web::{web, App, HttpServer};
use sqlx::postgres::PgPoolOptions;
use std::env;

mod beechat;
use beechat::{web::*, database::{create_database_pool, setup_database}};

#[actix_web::main]
async fn main() -> std::io::Result<()> {
    let database_url = env::var("DATABASE_URL").expect("DATABASE_URL must be set");
    let db_pool = PgPoolOptions::new()
        .connect(&database_url)
        .await
        .expect("Failed to create pool");

    let create_db = create_database_pool().await.expect("Failed to create the database pool.");
    setup_database(&create_db).await.expect("Failed to setup the database.");

    HttpServer::new(move || {
        App::new()
            .app_data(web::Data::new(db_pool.clone())) // Correctly pass the cloned database pool
            .route("/create_user", web::post().to(create_user)) // Assuming create_user is in the web module
            .route("/create_chat_room", web::post().to(create_chat_room)) // Assuming create_chat_room is in the web module
            .route("/send_message", web::post().to(send_message)) // Assuming send_message is in the web module
    })
        .bind("127.0.0.1:8080")?
        .run()
        .await
}

Note that we created a new App and HttpServer in the main.rs file. These two allow us to create a new HTTP server and route to the application.

You can head over to Digital Ocean to create a database, fetch the connection URL, and export it:

export DATABASE_URL=postgresql://doadmin:[email protected]:25060/defaultdb?sslmode=require

Now, let’s run the application:

cargo run

Awesome! While the server is running, quickly pull out an HTTP client like Thunder Client and test it:

chat app with Actix

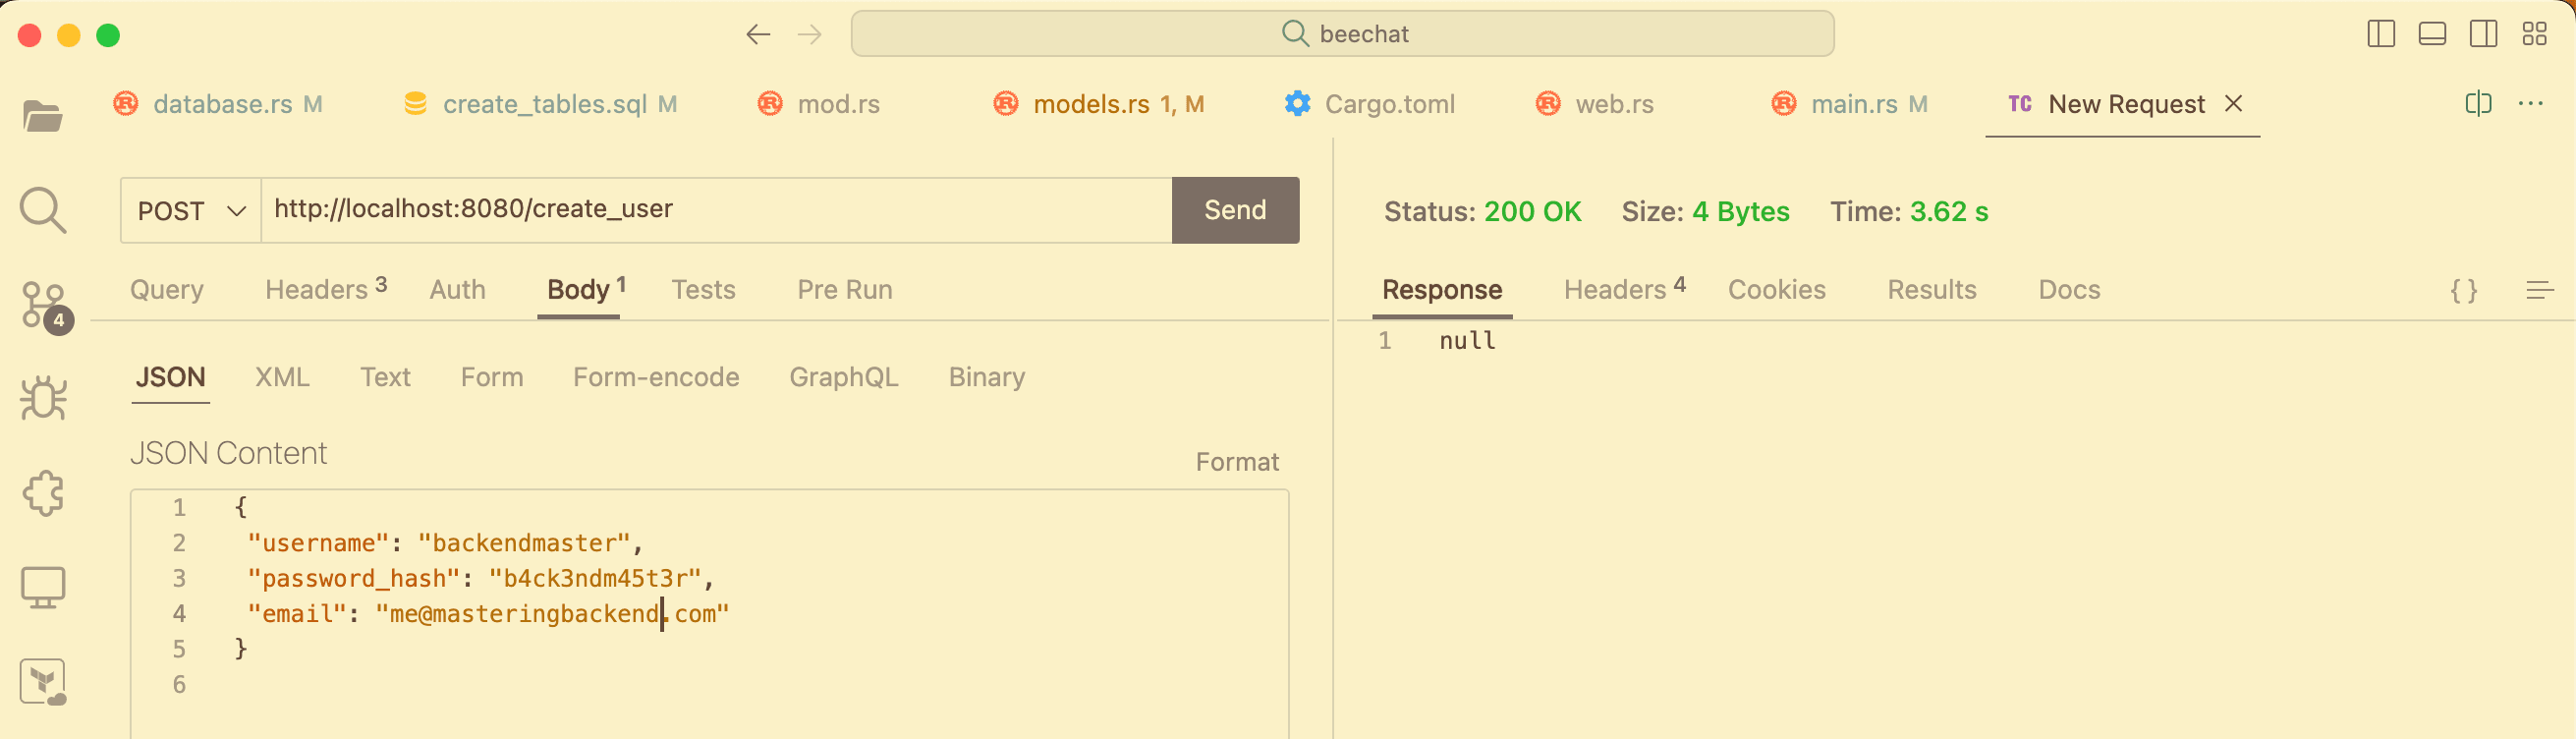
We get a Status: 200 OK messages confirming it works. In our create_user function, we returned a null response as a way to keep things simple, and this is displayed under the Response header above.

5
Chapter 5

Conclusion: Actix Web

0 articles
~0 min

In this Actix Web tutorial, we have looked at Actix Web's nitty-gritty and created a Real-Time Chat application to demonstrate the knowledge we have gained so far.

Now, it’s your turn to practice everything you have learned until you master them by building a real-world application.

Let me know what you’ve learned from this Actix Web tutorial and what you will build.

Congratulations!

You've completed the "Actix Web: The Ultimate Guide (2023)" definitive guide

Tags

Enjoyed this article?

Subscribe to our newsletter for more backend engineering insights and tutorials.